Prerequisites Before Enabling
Before you turn on the automatic scheduler, make sure you have completed the following configuration steps:
- Checkride types — You need at least one checkride type configured with a duration. The scheduler needs to know what you offer and how long each checkride takes.
- Testing locations — At least one testing location must be added. The scheduler uses locations when matching applicants to slots.
- Availability — You need availability blocks or recurring availability series set on your calendar. Without availability, the scheduler has no time slots to fill.
If any of these are missing, the scheduler will not have enough information to generate offers, even when enabled.
Navigating to Scheduler Settings
To access the scheduler settings, click Settings in the sidebar and navigate to the Scheduler tab. This page contains all the controls for the automatic scheduler, including the enable toggle, priority settings, and advance booking windows.
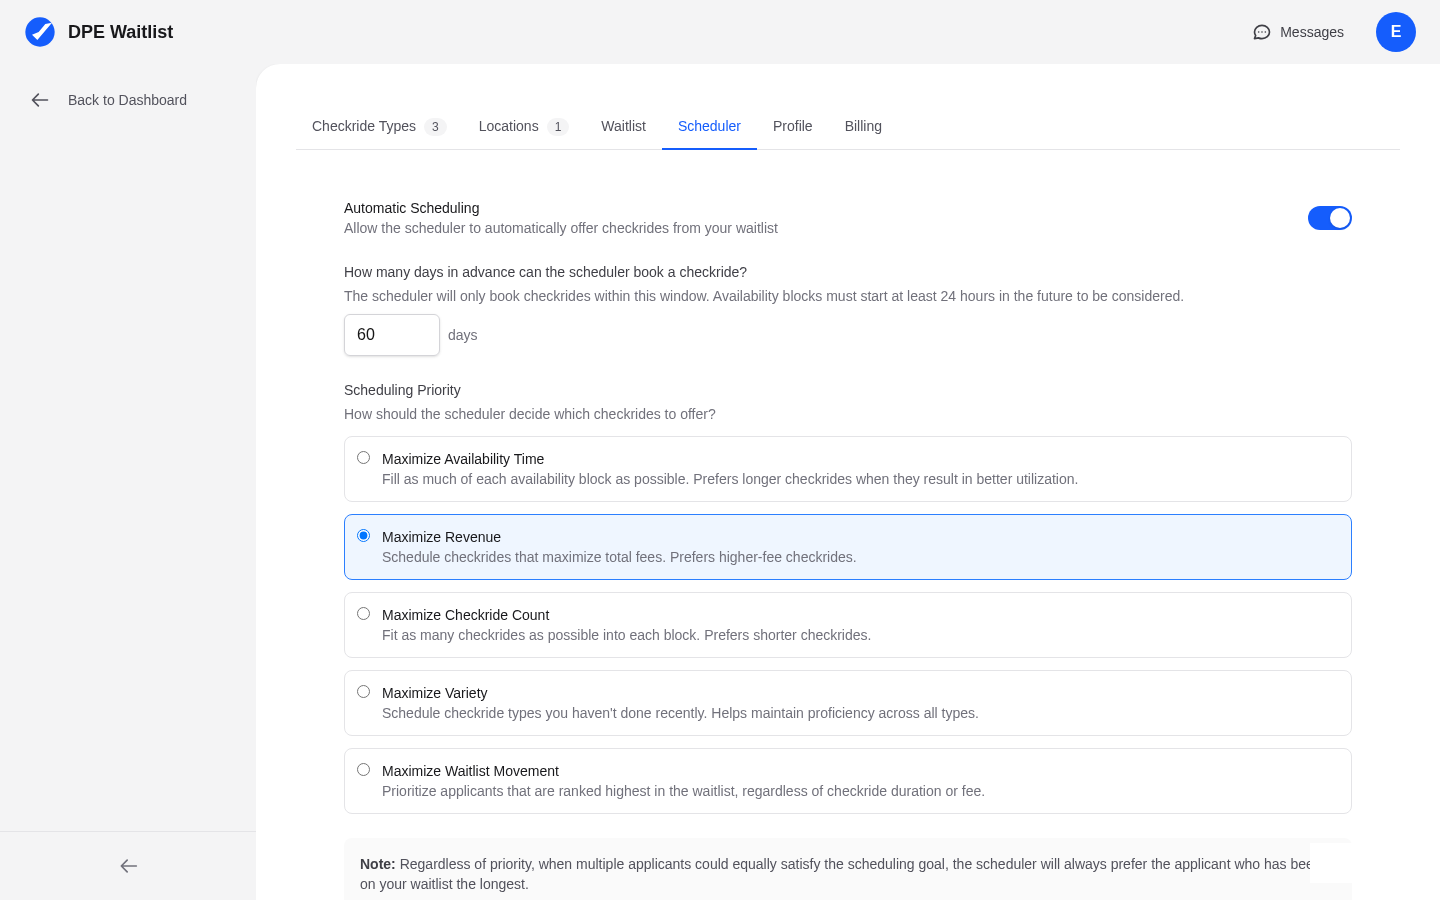
The Enable Scheduler Toggle
The main toggle on the scheduler settings page controls whether the automatic scheduler runs for your account. When you flip this toggle on, the scheduler will begin analyzing your availability and waitlist on its next cycle to generate checkride offers.
The Enable Waitlist Toggle
There is a separate toggle that controls whether applicants can self-join your waitlist from the DPE map. This is independent of the scheduler toggle:
- Enable Waitlist ON, Scheduler OFF — Applicants can join your waitlist, but you schedule checkrides manually.
- Enable Waitlist ON, Scheduler ON — Applicants can join your waitlist and the scheduler automatically fills your calendar.
- Enable Waitlist OFF, Scheduler ON — Only applicants you invite can join your waitlist, but the scheduler handles scheduling for those applicants.
- Both OFF — You manage everything manually, including who joins your waitlist and when checkrides are scheduled.
What Happens After Enabling
Once the scheduler is enabled, it will begin working on its next regular cycle. If you have applicants on your waitlist and availability on your calendar, you can expect to see offers being generated and sent to applicants. If your waitlist is empty, the scheduler will not take any action until applicants join.
First-Time Expectations
After enabling the scheduler for the first time, give it one full cycle to analyze your setup. You should start seeing offers appear within a few hours. Check your calendar and the Checkrides list to see the offers that have been generated. If nothing happens after a full day, review your prerequisites to ensure everything is properly configured.